Tuesday, June 25, 2013

Simple Rhubarb Pie Recipe


Hi there fellow Rhubarb lovers. Welcome to my little blog.  Today I want to share a Simple Rhubarb Pie Recipe with you.


Rhubarb Pie


Rhubarb Plant
Ten years ago, I was gifted a teeny tiny rhubarb sprout. I planted it in my backyard and it flourished. 

Over the years, I found teeny tiny rhubarb plants. My plant had babies which I gifted to friends so they could grow their own.

This is our second time to trim back the rhubarb plant this year. We didn't want the stalks to go to waste this time so we decided to make a pie.

I know, all these years and we have never made anything with it. Weird right.


Simple Rhubarb Pie

Before we could even start the pie we had to harvest a few stalks of rhubarb. I enlisted the help of two very eager little five year olds.

Of course that meant playtime. The huge leaves were used as umbrellas and fans. Smaller leaves were hats and plates for mud pies. I was too slow at getting my camera out. Darn it.

chopped up rhubarb stalks
I handed the collander of rhubarb over to my eighteen year old daughter. She took it from there.

Ingredients for Rhubarb Pie

  • 4 cups of rhubarb chopped up
  • 1 1/2 cups of sugar
  • 1/4 cup flour
  • Pie crust for top and bottom

Directions for Rhubarb Pie

uncooked rhubarb pie
  • Preheat oven to 450 degrees F (230 degrees C).
  • Chop up rhubarb in 1/2" pieces.
  • Prepare enough pie crust to cover the bottom of the tin and the top of the pie.
  • Combine flour and sugar. Set aside.
  • Pour chopped rhubarb into prepared pie shell.
  • Sprinkle combined sugar and flour over rhubarb.
  • Dampen edges
  • Top with second crust.
  • Crimp and trim edge of crust to seal
  • Pierce the top crust with a fork for vents
  • Bake pie at 450 degrees F (230 degrees C) for fifteen minutes.
  • Reduce heat to 350 degrees F and continue baking for another 40 minutes until the filling is bubbling and the rhubarb is tender.

Rhubarb Pie
I prefer to eat rhubarb pie when it's cold - especially in the summer - so I waited to enjoy this tart summer treat.

I actually waited 'til the next day which turned out to be absolutely gorgeous. It was warm but a refreshing breeze sauntered through my back yard.

I had a full cup of milk to calm my taste buds after tart bite. It was so good. Too bad everyone else in my family likes rhubarb pie too. In the blink of an eye it disappeared. I only got this one piece.  :(


*****************************************************************

Well, thanks for stopping by. I hope the instructions were clear enough. Please let me know if there is something I could have explained better.

Rhubarb Pie
If your interested, stop by my Etsy Shop, Little Shop of Treasures or check out this free printable calendar.


If you would like to receive my blog updates please subscribe via email or follow me on TwitterPinterest or Blog Lovin.


Rhubarb Pie


Have a fantastic day.


saving4six
Hey Carrie, I am so grateful and thrilled that you featured this post about rhubarb pie at Saving 4 Six.


Hi Marcie, thanks for featuring my Simple Rhubarb Pie Recipe on your blog, I Gotta Try That.


Sunday, June 16, 2013

The Secret Life of a Crafting Hoarder

Good day fellow Crafty People. Welcome to my little blog.  I am so glad that you are here. Let's just jump right in there. Okay?


**********************************************

Hi. My name is Darlene and I am a crafting/DIY hoarder.

I just gave myself an anxiety attack. 

Okay, so let's just rethink this. I am a crafter and DIYer. In order to make anything, I need supplies and inspiration. It just so happens that my supplies are inspiring. 

For instance, last week, down the street from my home, there was a vintage hutch with drawers and glass doors. I thought it looked gorgeous but my neighbor was throwing it away. I really wanted to take it home and put it in my garage so I could paint it. I already imagined the finished product and it was stunning.

Well it was raining that day. And the hutch was solid wood so it was heavy. I was alone. I thought about asking my Mom to come up with her van so she could help me transport it to my house but I decided not to. 

I could hear her saying, "what do you want that for?" 

Me. "I want to paint it and sell it."

Mom. "It looks like it's in pretty bad shape."

Me. "No. Not really. It just needs a good paint job."

Mom. "You don't have any room for it. Your garage is already full."

Me. "There's enough room near the front of the garage on the right hand side."

Mom. " You already have that vanity in there. And the table. And the chairs."

Me. "I know. But I really like this hutch. It's a shame that it is going to the dump."

Then she will give me that look. I will end up feeling guilty for even thinking about taking it home.

And she's not the only one. My daughters and husband react the same way.

It just breaks my heart to have to walk away from all that beautiful furniture that someone is throwing out.

They make me so mad. How dare they make me feel guilty for being such an imaginative creator of beauty. 

Nope. I won't have it. I refuse to feel guilty. I have no choice. They have forced me to be sneaky. 

That's okay. I can sneak a pillow case in here or there, maybe table cloth. I can mix it up with some clothes for my granddaughters and no one will be the wiser. Tee hee hee. Then when I get home, I can just slide it into my closet. It will be our little secret.

As for the hutch? I grabbed two of the drawers.


Why? Because I had to. I didn't want to feel complete remorse for not acting on my urge to make that hutch my own. Do you know what I mean?

Hey look! Wouldn't you know it, DVD's fit nicely in them. Perfecto.

Furniture isn't my only obsession. I love yarn. All those beautiful colours and textures. So many projects spinning in my head. 

Oh, and I absolutely adore fabric. I have pillow cases, sheets, curtains, table clothes. I like to sort them and look at them, admire them. More projects to do so little time.


Just look at all that beautiful fabric. 


Just give me a minute. I want to play. 
This looks nice with this, and this. . . .
I can't forget my paints and brushes, canvas boards and frames.

Not to mention my vintage glassware that I sell on Etsy.


Let's take a closer look.  It's just too pretty.

Last but not least, I have to include all the other items I need to put these projects together - like glue, thread, crochet hooks and knitting needles, scissors, buttons, elastic, magnets, thread, sewing needles, all kinds of paper ... You get the picture.

Right now it is kinda spread out. I don't dare put it all in one place. That would be like admitting that I am a hoarder - which I am not.

I may be more of a shop-o-holic. I can spend hours in the craft store looking at all the fabric, yarn, crafting tools and notions. 

Even more time at the thrift store because the possibilities are endless. Furniture. Oh the furniture. Lamps. Vintage items. Clothes. Sewing patterns. Crafting books. Ah. It is a beautiful day.

To think of it, I am more like a collector. An admirer of beautiful things. I can see the beauty and potential in just about anything. Why it was just today that I finished the last bit of coffee in the jar and thought, what can I make from this. I better save it for something. Maybe a piggy bank for Faith?  Nah. I better just put it in the recycle bin quick - because I am not a hoarder!

What about you? Are you a hoarder? Shopper? Collector?


Look! I have been featured on Inspire Us Thursday.

Thanks so much Susan. Check out her super blog! 
Susan@Organized31


Well, thanks for stopping by. I hope you enjoyed today's post.

If your interested, stop by my Etsy Shop, Little Shop of Treasures.

If you would like to receive my blog updates please subscribe via email or follow me on TwitterPinterest or Blog Lovin.


Have a fantastic day.

Thursday, June 13, 2013

Another No Sew T-Shirt Transformation.

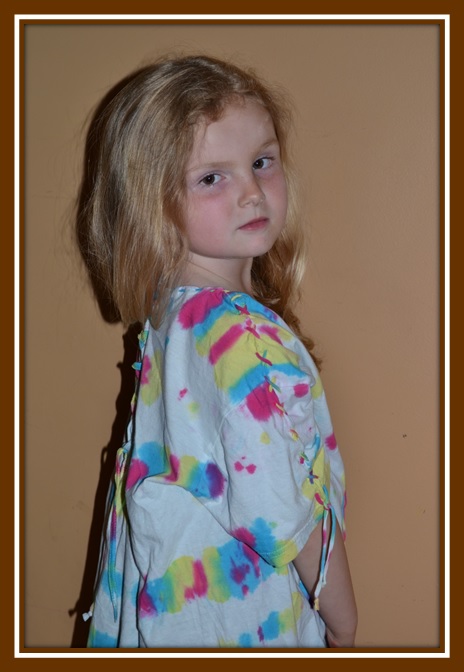
Adult T-Shirt Transformed Into Child's Beach Cover UpHi there fellow Crafty People. Welcome to my little blog.  I am so glad that you are here. 

Today I want to share another t-shirt transformation project that I just completed.

Last summer, my daughter, Cole tried her hand at tie dying. For whatever reason, she decided to give it away. So I rescued it. 

The T-Shirt is an adults small which won't fit anyone I know. Then it struck me. I'll just transform it into a nice little beach cover up for my four year old granddaughter. 

THE TRANSFORMATION

Materials

  • One t-shirt 
  • Sharp scissors for cutting fabric
  • Ruler 
  • Darning needle 

Instructions

I started with the neck of the T-shirt. It was too big. So I cut it off.

I know, cutting it off doesn't make it smaller, but the idea was to add a drawstring. I'll get back to this in a minute.


The second step was to cut off the t-shirts small hem at the bottom.

Then I cut four thin strips off the bottom of the t-shirt and pulled them tight so it looks more like thread or yarn.

One strip was designated for a drawstring around the neck. One was for lacing up the back and one each for lacing the arm sleeves.

I cut the fringe along the bottom of the shirt. It isn't too long because my granddaughter calls it itchy. I know she means it tickles her legs.

The strips are as thin as I could comfortable cut them. Then I stretched each strip out by pulling it tightly.

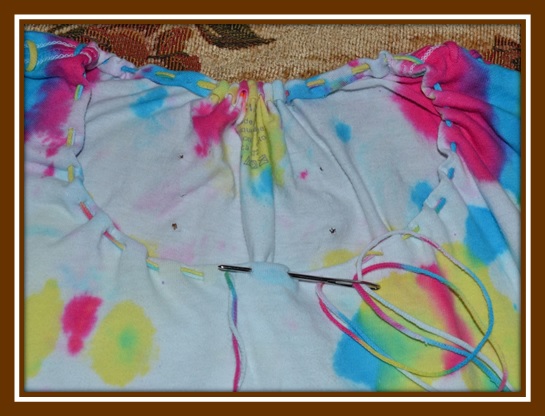
Okay back to the neck line. I used one of the strips that I had cut from the bottom of the shirt to weave a drawstring around the neck line. If you look at the first picture up there you can see what I mean.

I had my granddaughter try on my new creation. I knew that I wasn't done yet but I wasn't prepared for the awkward looking shoulders on the cover up. That definitely needed to be fixed.

I laid the laid the t-shirt down flat on the table and using a ruler I cut a straight line from the neck line to the edge of the arm sleeve.

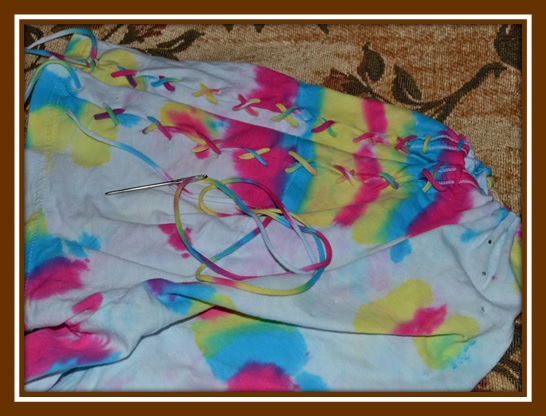
To close up this opening I used one prepared strip as laces on each arm sleeve.

At the end of the sleeve, I tied a knot. And at the end of each lace, I tied a knot.

The last part of the project was to lace up the back of the cover up which was actually my first idea for making the cover up.

All done!

I asked Faith to model her new beach cover up. She felt a little silly and shy but I think the pics turned out nice.


She is wearing a dress under the cover up but you
 can see the neckline, laced sleeves and fringe along
 the bottom.
Faith is feeling a little shy and not sure what to do.
Holy cow her hair is getting so long. 


That was fun. I hope to do a few more in the up and coming weeks. There are so many ways to cut a t-shirt.


***************************************

Do you know someone who would love this T-Shirt Transformation? 


Are you going to give it a try?


***************************************

Well, thanks for stopping by. I hope the instructions were clear enough. Please let me know if there is something I could have explained better.

If your interested, stop by my Etsy Shop, Little Shop of Treasures or check out this free printable calendar.

If you would like to receive my blog updates please subscribe via email or follow me on TwitterPinterest or Blog Lovin.


Have a fantastic day.

Monday, June 3, 2013

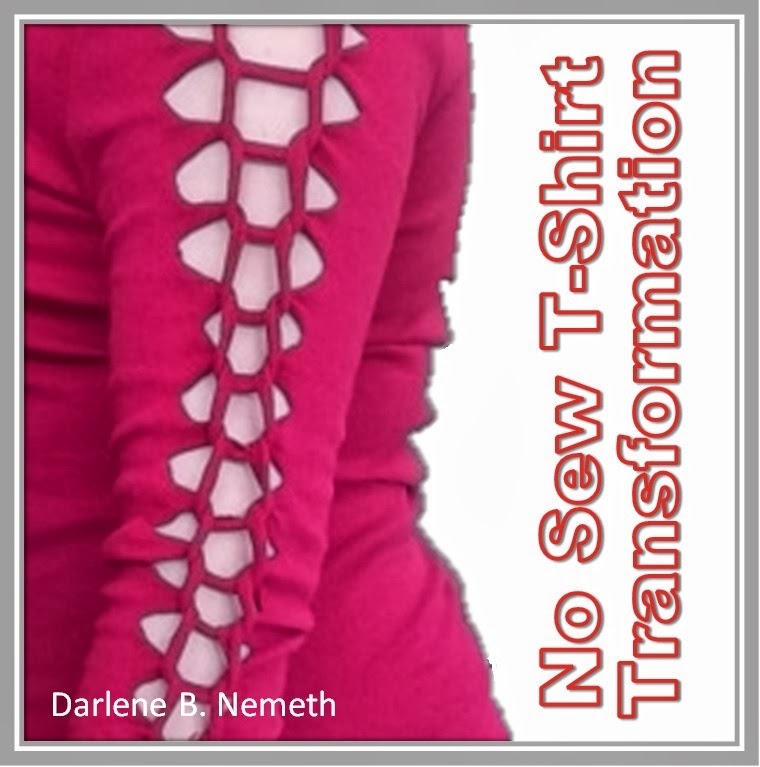
A No Sew T-Shirt Transformation


Hi there fellow Crafty People. Welcome to my little blog. 

Today I want to share something with you that I have been wanting to try for a long time. It's also something that my youngest daughter, Christina wanted me to try.

It's a no sew t-shirt transformation!


T-Shirt Cutting

It is a no sew t-shirt transformation. It's an easy and fun project to do. 


diy t-shirt refashions


Materials

  • One t-shirt with long sleeves
  • Sharp scissors for cutting fabric
  • Ruler or measuring tape and chalk if you want to be precise 


Directions For Long Sleeve T

diy t-shirt refashions
At this point I have already lined up the
sleeves, cut through all four layers and
pulled the sliced material tight. I should
have taken three pictures here instead 
of this ONE.

1.)  Fold the T-Shirt in half, lining up the sleeves perfectly.


2.) Measure and mark the wideth of each slice in 3/4" increments on the upper part of the sleeve.


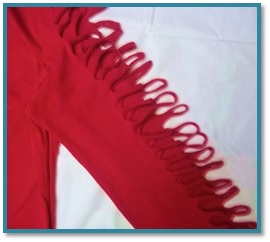
diy t-shirt refashion
A another look at a sleeve. You can see
the loops better in this picture.


3.) Measure and mark the length of each slit.

4.)  Cut through all four layers of the two sleeves.

Or skip the measuring and marking and just eyeball it and cut through all four layers of the two sleeves like I did.

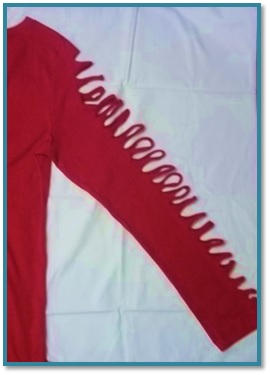
diy t-shirt refashion
A pic for step 5. Sorry about the blurry
picture.  I need a new camera and a 
steadier hand. This  is the sleeve laying
flat just waiting to be worked on.

5.)  Open up sleeves and pull fabric tight.

6.)  Starting at the top, weave the first loop down into the loop directly below it.

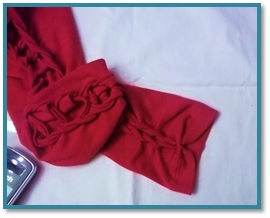
diy t-shirt refashion
And this is a pic for step 6. Starting
at the top of the sleeve, pull the first 
loop of material down and pull the 
second loop through the first loop.

7.) Continue all the
way down the sleeve
until you get to the
last loop.


8.)  I used crochet thread
to tie the last loop and the
end of the sleeve together. 
The knot is hidden on the
inside of the sleeve. It is 
tied to prevent the sleeve
from unraveling.


diy t-shirt refasion
9.)  All done the first sleeve.

10.)  Repeat instructions for the other sleeve.

11.) And now you're done!


diy t-shirt refashionsThat was fun. I hope to do a few more in the up and coming weeks. There are so many ways to cut a t-shirt. If you would like to see more t-shirt transformations please click HERE.


Do you know someone who would love this T-Shirt Transformation? 


Are you going to give it a try?


Look, I Have Been Featured!


Yahhh! This no sew project was featured at All Things Pretty. Thank you Leslie!


***************************************


 photo grabbutton2_zps7d635a69.pngAhhh, thank you! Carol and Linda at Crafts a la Mode featured this post too. Thanks ladies. "Darlene Nemeth, has a tutorial on how to transform a T-shirt with NO SEWING and it’s GORGEOUS. I’m so doing this!!"


***************************************

PinkWhen


Thank you Shelly for favoriting my no sew project on the DIY Sunday Showcase Talent Pinterest Board. Stop by her blog and say hi.


***************************************

As of December 29, 2013 this post has been pinned 373 times. That is so exciting.


But hang on one second. I found this site,
 http://pinterestplugin.com/pincount/

If you want to find out the pin count on Pinterest for a specific post you have to try this. Obviously I had to try it. So here it goes.


Oh my gosh. That's incredible. It is so easy to use.


Well, thanks for stopping by. I hope the instructions were clear enough. Please let me know if there is something I could have explained better.

If your interested, stop by my Etsy Shop, Little Shop of Treasures or check out this free printable calendar.

If you would like to receive my blog updates please subscribe via email or follow me on TwitterPinterest or Blog Lovin.


Have a fantastic day.