Sunday, December 29, 2013

Ten Reasons These Are My Top Three Posts

Hi. I'm so glad you decided to stop by.

I thought the best way to end the year would be to review my top three posts. 

There are two reasons. One, I have a reason to share my posts again. :)  And two, we can figure out what I may have done right so we replicate it.

Will you help me figure out why these are my top three posts?


The Top Three Posts Are:

No Sew T-Shirt Transformation


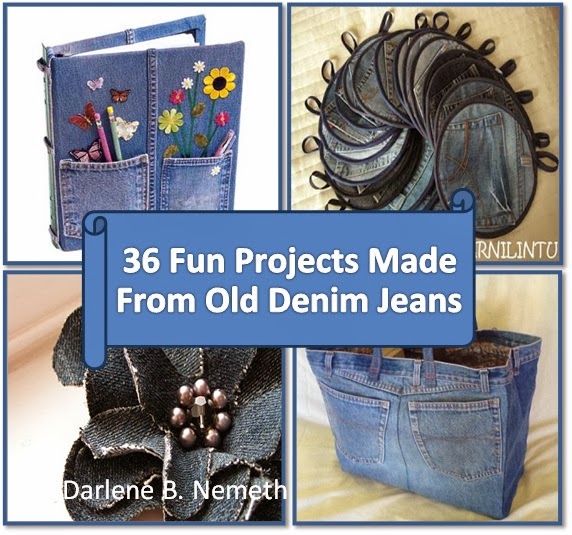
36 Fun Projects Made From Old Denim Jeans


Make Your Own Rag Rug This Weekend


Possible Reasons for The Popularity of The Top Three Posts

  1. Great posts will usually answer a question, solve a problem, make the audience laugh or cry. I guess you could say they answer the question how. All three posts are tutorials.
  2. The topics can appeal to a large audience.
  3. The images are appealing.
  4. The titles are attention grabbing.
  5. Headlines, numbers and bullets are used strategically.
  6. These posts were promoted at a lot of Linky Parties, on Google+, Twitter and Pinterest.
  7. I love interacting with readers and other bloggers.
  8. The posts are formatted using line breaks and bold fonts for easy reading.
  9. The posts are not too long but are quick to read.
  10. The content is clear and straight forward.


******************************


I'm jumping up and down with joy. I can't thank you enough Heather. 

This post has been featured on Heather's blog, My Sweet Mission.


******************************

I'm doing my happy dance! Thanks Linda for featuring my post at your party.

Hey everyone, check it out HERE


******************************


Well thanks for stopping by. I hope you enjoyed reading this post. 


And don't forget to stop by my Etsy Shop, Little Shop of Treasures or check out a few other posts.

If you would like to receive my blog updates please subscribe via email or follow me on TwitterPinterest or Blog Lovin.

I look forward to reading your comments. Make my day and leave one!

Wednesday, December 18, 2013

Pipe Cleaner Puppets - Fun to Make and Fun to Play With

Pipe Cleaner Puppets- Fun to Make and Fun to Play With


It's been snowing off and on for the past five days. The small flakes are just gently falling so it isn't technically a snow storm but that white stuff is accumulating here. 

I don't mind the snow. It's the wind that's the killer. And the frigid cold air which freezes your boogers in seconds. That's definitely not fun.

Honey bunny loves all the snow. She rolled around in it for almost forty-five minutes after school. But then again she is all bundled up with her new mitts, hat, snow suit and boots.


She didn't come in because she was cold. She came in because she was hungry and needed a snack.

Any how, I have another fun little project to share with you. 


I was at Michael's the other day, picking up yarn when I saw this craft package on sale for 50% off. Well I just had to snag it up quickly. 

I am always looking for new things to do with my granddaughters.

It has all the materials to make 24 puppets. That's four of each puppet. That is perfect. Enough for three granddaughters and one for me!

Unfortunately there were no instructions. I don't know if it was only my package missing instructions or if that's how they come. 

I had to wing it.

Thank goodness the picture on the package cover was big enough I could (if I squeezed my eyes) see how it was put together.

Unfortunately, I couldn't make my own puppets. The girls kept me busy helping them.


To begin with, I had to make the faces by swirling the pipe cleaners around. I took this picture so you can see what I mean.

I left two inches of the pipe cleaner straight and inserted it into the straw.

The package cover puppets are glued to the straws. I thought it would work better by inserting the pipe cleaner right into the straw.

Once I prepared the faces, the girls started gluing the googly eyes down and some of the other pre-cut pieces.

I had to cut the ribbon and pipe cleaners. 


Oh, and I had to make the snowman's hat. I swirled it around a paint brush handle then made a larger loop for the hat's brim. I think it turned out alright.

And the angle's halo. Which I stuck into the straw too.

Okay, I had to prep all the parts that didn't come pre-made. The girls aren't coordinated enough yet.


Honey Bunny's ginger bread man has pink rosy cheeks. The placement makes me think they are earrings but she insists that they are cheeks. LOL


The girls and I had fun and they are very proud of their puppets.


*******************************

Well thanks for stopping by. I hope you enjoyed reading this post. 


And don't forget to stop by my Etsy Shop, Little Shop of Treasures or check out a few other posts.

If you would like to receive my blog updates please subscribe via email or follow me on TwitterPinterest or Blog Lovin.

I look forward to reading your comments. Make my day and leave one!


Wednesday, December 11, 2013

7 Things I Look For On Your Blog?


Please Share the Love
One of the things that I love most about blogging is visiting my fellow bloggers and checking out their amazing posts.

Of course when I find something particularly interesting I want to share it. I want to know more about the blogger and I want to be able to follow them. 

Sometimes it can be so frustrating. But more importantly, that blogger is missing out - missing out on the sharing and following. Not that I am a super star blogger but every bit helps right.


7 Things I Look For When I Visit Your Blog


1. Awesome Images

No matter where I start from, whether it is a Linky Party, Pinterest, Google Plus, what ever, I am first and always attracted to your post by the image you have on display.

Everyone knows that. And that is something I am definitely working on. 

I started off with my regular digital camera but have upgraded to a Nikon DX. Mind you I love taking photographs and I wanted a better camera anyway. But holy cow, what a huge difference! I'm going to eventually go back and put better pictures on my older posts.

Many bloggers use IStockPhoto, or Flickr for images and that's great if it works for them but it doesn't for me. I wasted so much time looking for pictures just to be disappointed.

Oh ya, an awesome image isn't necessarily a professionally taken photograph. An awesome image is one that shouts out for attention.

There are many different ways to attract attention, like through colour, lack of colour or just something plain fun. 

2. Sharing

Sharing is caring! When I read something good, I want to share it. The easier you make it for me to share the better. If I have to work too hard at it I'll just skip it and move to another blog.

I like Pinning. As soon as I realize that I like your post, I want to PIN it. And the easiest way for me to do that is to click on the Pinterest icon that appears right on your pictures when I hover over it. I don`t have to search for it or strain my eyes to see it. 

(There are all kinds of places on the net to get instructions for putting the Pinterest hover button. This is just one. Click HERE.)

Done and move on. It has to be that simple.

If you make it easy for me, I`ll even share your post on Twitter and Stumble. I`ll like your Facebook page. Make me search for those sharing buttons and I`ll likely just skip it.

This is where I got my share buttons. Click HERE. It's free and easy. 


3. Showing Off Your Best

So I`m on your blog and I've shared your post. Now what?

I want to see more. What else do you got? Anything interesting?

Try showing off your popular post in your side bar.

Or put "You Might Also Like" at the end of a blog post. Click HERE to add it to your blog.

Either way, you'll keep me on your blog longer while I bebop from post to post.


4. Your Picture

I don`t know about you, but I love seeing a picture of the blogger. It`s you that I can relate to. It`s you I want to follow. And it`s your writing I want to read. Plus I tend to remember you face more than a blog title. 

To me, your face is like your business logo. Memorable.


5. Your About Me Page

Everyone likes to feel like they fit in. 

It`s a good feeling when I get to read more about you and find we have something in common. This alone could be the reason I follow you and share your posts. Is this true for you too?


6. Follow Me Buttons

Once I decide to follow you please make it easy for me to do it. 

There`s nothing more disappointing to really like a blogger but can't follow them because you can`t seem to figure out where the follow me buttons are.

I just changed my buttons. They were spread out but now they are grouped together. We'll see if it makes a difference.

This is where I got my follow me buttons. Click HERE. It's free and easy.

7. Subscribe by Email

It`s all about the list. Well, that`s what everyone is saying. So make sure that is an option for me. 

Besides, lately I've noticed that I prefer to subscribe by email. Sure it means  loads of mail but I find it a challenge to get my email back down to zero. I scan emails, reading and deleting as I go.

I actually just moved this box to the top of my right panel and I already got more email subscriptions in this last couple of weeks than I did in the last year. Bonus.

I use FeedBurner. Click HERE. Or if you prefer MailChimp, click HERE.

To be honest, I don't know what the difference is and I can't remember why I choose FeedBurner. It works.


*******************************


I'm jumping up and down with joy. I can't thank you enough ladies. 

This mother and daughter dual, Debi and Charly featured this post on their fabulous blog Adorned From Above.


*******************************


This is too exciting. 

I would like to thank the hosts of the blog hop for featuring this post. I am honored.

To see the other featured posts and meet the hosts, please click HERE.

Terri Henkels publicly sent out this invitation, "Stop by and see the post Features of the week by some creative and great bloggers." 


*******************************

I'm doing a happy dance now! 

This post has been featured on the Blog Strut as the most clicked.


*******************************


I'm dancing again.

Thank you Carol and Linda for featuring my post at your party.

Check out the smiles on these lovely ladies.


*******************************


Well thanks for stopping by. I hope you enjoyed reading this post. 


And don't forget to stop by my Etsy Shop, Little Shop of Treasures or check out a few other posts.

To receive my blog updates - please subscribe via email or follow through one of the other social medias. And don't forget to share the love.  :)

I look forward to reading your comments. Make my day and leave one!


Wednesday, December 4, 2013

DIY Santa Claus Ornaments

Hi, another week has come and gone. Before we know it, Christmas Eve will be upon us.

I haven't started decorating or shopping yet. 

I can't decorate until I start shopping because that would make me feel too anxious. And I can't start shopping until my EI is approved and I start receiving money.

Oh well, that's another story.

I do however have a cute little project to share with you. It's a clothespin made into a Christmas tree ornament. A Santa Claus to be precise. 

Check it out.


He's actually pretty easy to make. I started by painting in blocks of colour. The red hat and suit, the flesh colour for his face, the black boots. 

Once that was dry I painted the white parts.

The face details were the last to be painted.


Now we need to add the wire so we can hang him from the tree. 

I used a thin gold wire - wrapped it around the top of his head, twisted the wire at the back and created a small loop.


I cut some gold cord into five inch lengths - one for each Santa. 

Thread the cord through the gold loop then tie a knot.


Now they are all done! Great job!

If only it went that fast. Eh?  LOL


I think they look a little weird. What do you think? Maybe they need arms? 

Wait a sec. Let's check out how they look hanging from the tree with all the other ornaments.


Hey! Santa actually looks pretty good on the tree. 

Maybe I was just looking at them too closely. Now with them spread out over the tree they look not bad. 

I guess they can stay on the tree. For now.


**********************************


Thank you Theresa for featuring my post on Dear Creatives

This is what she had to say, "This would be a fun projects to do with the kids! Santa Ornaments made with wood clothes pins! Thanks to Darlene over at My Little Shop of Treasures on Blogspot for sharing this Santa Ornament DIY!"


**********************************


Thank you Amy for featuring my Santa Claus ornament on your blog, Marvelous Mommy.

And thank you for pinning it to your Create Link Inspire board.


**********************************


Thank you, thank you, thank you ladies for featuring my Santa Claus Ornaments at your Take It On Tuesday Blog Hop Party.

Check out the blogs of these three great ladies:
1) Romance on a Dime 
2) Eyes on the Source
                       3) Hi! It’s Jilly


**********************************


I am amazed. Thank you Katie for featuring my little Santa ornaments on your blog, Gift of Curiosity.


This is what Katie wrote. "If your kids love Santa as much as mine do, I hope you’ll enjoy the fantastic Santa crafts below from the amazing bloggers of the Weekly Kids’ Co-op."


**********************************


Well thanks for stopping by. I hope you enjoyed checking out a few fellow blogger projects and found something inspiring. If you did please feel free to share the love.

I would love to see your projects made from old sweaters - just add a link below in the comments.


And don't forget to stop by my Etsy Shop, Little Shop of Treasures or check out a few other posts.


You can also find me  on TwitterFacebook and Pinterest. See you there.


Post a Comment
I love to read your opinions and comments. It makes my day a little bit brighter. 

My apologies, all anonymous comments are deleted due to an excessive amount of spam.


Wishing You a Wonderful Week.


Tuesday, November 26, 2013

35 Fun Old Sweater Projects


Hi, how wonderful of you to stop by to pay me a visit.

I hope you enjoy this post. Sit back and sip your coffee while you check out these 35 Fun Old Sweater Projects. I choose them with you in mind - things I thought you might appreciate. Enjoy.

Here we go.  :)


old sweater projects


Alicia at Thrifty And Chic shared this quick and easy project. She covered her lampshade with an old sweater.

All you need is a sweater, scissors and hot glue!

Click HERE to see the tutorial.


Infarrantly Creative shared a post about making Boot Socks from old sweaters. Great project for this time of year.

Click HERE to see the tutorial.


Christmas Stockings made from old sweaters

Kelly at Imperfect Home Making whipped up these gorgeous stockings from her old sweaters.

I love how she positioned the buttons down the front.

Click HERE to see the tutorial.
A pillow cover made from an old sweater
Add caption


Liz at Love Grows Wild made these cozy pillows from Goodwill sweaters and old pillow forms she had around the house.

Click HERE to see the tutorial.


Alicia at Thrifty And Chic shared this second quick and easy project. She covered her vase with an old sweater.

Click HERE to see the tutorial.


Urban Threads made these cute mitts by upcycling the dreaded Christmas sweater.

She includes a pattern.

Click HERE to see the tutorial.


Donna at A Doll For All Seasons shares her tutorial with us. 

Isn't this doll sweater adorable?

Click HERE to see the tutorial.


blanket made from sweaters
Oh my gosh this sweater blanket looks absolutely gorgeous and cozy.

Michele from Yellow Suitcase Studio shares her step by step instructions. 

Click HERE to see the tutorial.


Check out this amazing infinity scarf tutorial from Suzannah at Adventures in Dressmaking.

Click HERE to see the tutorial.


Ilene at come on ilene shows us how to make this super cowl from an old sweater.

Click HERE to see the tutorial.


Alida shares a detailed tutorial on her blog Alida Makes so you can make your own baby cocoon.

Click HERE to see the tutorial.


Kathy & Susan have a blog called Just Crafty Enough. They share a quick and easy craft with us. Sweater covered candle holders.

Click HERE to see the tutorial.


Check out this DIY wreath at Artemis and Apollo.

All you need is: Yarn in the colour scheme of your choice, knitted sweater, pool noodle, duct tape, and a hot glue gun.

Click HERE to see the tutorial.


Here is a sweet sweater tutorial at Perched On A Whim. Looks like a wonderful purse for the cooler weather.

Click HERE to see the tutorial.


This is Holly's version of sweater pumpkins. You can see them on her blog, Bijou Lovely.

Click HERE to see the tutorial.


A light bulb went on and Hanna made these super easy and fun socks from sweater sleeves.

Click HERE to see the tutorial.
.

Joan shares her quick easy and fun project for old sweaters and sweatshirts.

Click HERE to see the tutorial.


Jen at Pink When shared her Beanie from an Upcyled Sweater which she says you can literally make in about 10 minutes.  She even included a video from start to finish.

Click HERE to see the tutorial.


Jen at Drawings Under The Table made these adorable upcycled sweater slipper socks.

Click HERE to see the tutorial.


Heather at The Sewing Loft likes to reclaim old sweaters and turn them into stuffies.

Click HERE to see the tutorial.


Susan at Organized31 repurposed sweater sleeves into gift bags. I love the colour.


Click HERE to see the tutorial.


Nancy made this cozy hat from - guess what - that's right - a sweater.

Click HERE to see the tutorial.


Ellen shared these holiday trees on her blog, The Long Thread.


Click HERE to see the tutorial.


Here is an adorable skirt made from a sweater.

Click HERE to see the tutorial.


Hat and Leg Warmers.

Click HERE to see the tutorial.


Mary and Jess shared the instructions to make this shabby chic tree skirt. Their blog is called So Eclectric.


Click HERE to see the tutorial.

Steph at stuffstephdoes made this DIY cowl from an old sweater. When I saw this I immediately thought of my daughter Cole.

Click HERE to see the tutorial.


Ashley made this adorable baby sweater dress. Her blog is called Make It Love It. I have to make one for my youngest granddaughter.

Click HERE to see the tutorial.


Resweater sews up this basket liner. It looks cozy enough for a doggy bed.


Click HERE to see the tutorial.


Here's another sweater make over. Home Workshop shares their instructions for this rug.

Click HERE to see the tutorial.


Erin at Crafts & Stitch shared a tutorial for this cutie. He'd look great as part of a winter vignette.

Click HERE to see the tutorial.


Alison at Heavenly Handmades made this cute DIY Dino Taggie from an old sweater. My Honey Bunny loves her tag.

Click HERE to see the tutorial.


If thrift is the name of the game, unraveling may be right for you?


The Elusive Thread Blog

Click HERE to see the tutorial.


Chelsea made these gorgeous sweater presents and shared them on her blog - Two Twenty One.


Click HERE to see the tutorial.


Kristine at LiberatedMind shares her upcycled projects. A hat and pants for her cutie were made from an old sweater.

Click HERE to see the tutorial.


**********************************


Yahoo! I have been Featured at The Crafty Blog Stalker. Thank you!

This is what Katie had to say. "Your practically famous, you should shout it from the roof tops!"


**********************************


Thank you Susan at Organize31 for featuring this post on your blog. 

"As always, I just love seeing all the great projects that were linked up last week at Inspire Us Thursday Link Party. You have inspired me with so many wonderful ideas for projects and recipes. And I always appreciate that you've taken the time to join me at my link party."


**********************************


Thank you ladies for featuring my post on your blog, Take It On Tuesday. I am honestly grateful and honored to have this post featured as one of the favorites. Thank you, thank you, thank you.


**********************************


Friday Pin FestThank you Alma from A Conquered Mess and party co-hosts

for choosing to feature my post.

This is what Alma had to say, "You have made it so hard for us to choose features this week! Thank you for coming back and linking up your great projects and recipes."


**********************************


Well thanks for stopping by. I hope you enjoyed checking out a few fellow blogger projects and found something inspiring. If you did please feel free to share the love.

I would love to see your projects made from old sweaters - just add a link below in the comments.


And don't forget to stop by my Etsy Shop, Little Shop of Treasures or check out a few other posts.

To receive my blog updates - please subscribe via email or follow through one of the other social medias.

Post a Comment
I love to read your opinions and comments. It makes my day a little bit brighter. 

My apologies, all anonymous comments are deleted due to an excessive amount of spam.


Wishing You a Wonderful Week.